
For those of you who have visited our home, you might have been unimpressed by the first two rooms in our house designated as the library and formal dining room. Part of the problem with moving into a house with “room to grow” is that there are a number of rooms that you rarely use or need and therefore sit there empty and unpainted while you focus on the rooms you actually use. The photo here shows how the library was, with the exception of the recessed cans that I have finished installing in this picture.
The problem in our house is that the library is one of the first rooms you see in our house and can be seen from the street. We’ll talk about our overhaul of the dining room in a future post, but I wanted to show off our new library which involved a number of different subprojects including installing lights, a built in bookcase and crown moulding.
The first step was to get some lighting in the room. In keeping with our fairly minimalist/modern style, we thought recessed cans. Given how straightforward the recessed can installation in the office went, I thought this would be a piece of cake. When we were purchasing our house, we had the builders put a couple of switched circuits up in the ceiling, so all that was left was to cut some holes and tie the wires together. This turned out to be one of th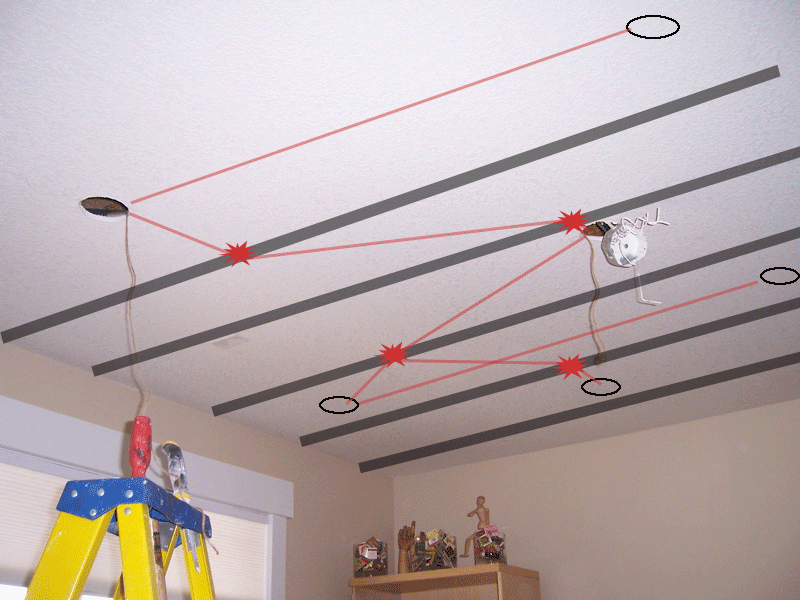 ose learning experiences in the standard way houses are built.
Our office is on the 2nd floor and so the ceiling just has 2×6’s and insulation lying on top of the drywall, but then crawl space above that. So fishing wiring from one can to another is pretty simple as you can just loop up through the insulation and over the ceiling jambs. The library is on the first floor and so the ceiling configuration is quite dfferent. There are floor joists that span from the 1st floor ceiling to the 2nd level floor every 16 inches with no holes to run wire through.
As you can see from the picture (with ceiling joists and planned cutouts added in) we had to punch through a total of four ceiling joists and then thread wire through these holes, all through a 4 inch hole in the ceiling. With a good 12 inch long 3/4″ drill bit I managed to drill through the joists from the holes. Then using a wire fishing rod, some twine and a coathanger we fished the string through one joist, captured it from the other end with the coat hanger, pulled it through and then used it pull the wire back through the two holes. There were a total  of four joists that needed to be drilled through and feed wire, but once they were done and the wire fished, the rest of the light installation was a piece of cake! I installed four cans for ambient light and one spot light for the picture area between the book cases.
Once the lights were in (and a pair of speakers in the prewired spots) it was time to get to painting. We have found that the secret to painting a room, especially in a bold color, is to use tinted primer – always. It will save you at least a couple of coats of paint everytime, and primer costs less! We chose a deep, dark blue for the library. The sort of blue that reminds you of the ocean under a slightly threatening sky, that causes you to think and reflect on life. Honestly, we just wanted a good contrast to the white of the trim and bookcases and I love blue – it’s america’s favorite color don’t you know? So this post ends with the room lighting completed and the walls painted. The next post will document the conclusion of this most excellent project with the construction and installation of the bookcases and the crown moulding, including hot tips from Kevin Richau on how to make sure you get your crown angles cut perfectly!